***** ALERT - Nominations for your new ClubCJ Committee can be made here *****

REVERSE PARKING SENSORS

Alarms, Smart Key, Batteries, Wiring, Engine/Computer Management & Racing Chips.

Moderators: Moderators, Senior Moderators

User avatar
solace
Lancer Newbie
Lancer Newbie
Posts: 64
Joined: Sun Dec 14, 2008 2:57 am
Location: Adelaide, SA

Postby solace » Wed May 26, 2010 10:36 pm

SAM-24A wrote: I found this easier and less damaging than drilling a hole in the boot as the OEM kit requires you to do. "


hey aspire, thanks for the reply. is this what you were referring to? i think here sam refers to getting the sensor wires from the bumper to the boot area where the control unit is.. he would still have had to drill holes next to his license plates to get them where they are i think hehe

if u can get a picture of that router drill bit that would be great.. i wil pm you my email.. i imagine they wouldnt be too difficult to get from bunnings etc :)

good suggestion with the practice.. will definitely do that !

User avatar
SAM-24A
Alumni
Alumni
Posts: 2921
Joined: Sun May 17, 2009 4:40 pm
Location: Sydney NSW

Postby SAM-24A » Thu May 27, 2010 5:01 pm

@ Solace,
the best and "definitely" the "safest" way to drill "perfect" holes in thin based materials such as sheet metal and especially car body plastic is to use Step Drills such as these:

Image
Image


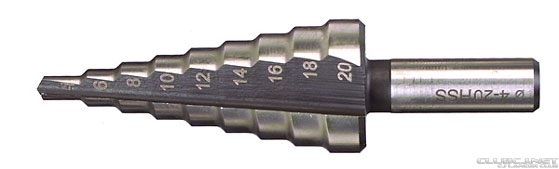
You will notice that each step on these drills is a different size getting larger the further you drill in.

They are available in either imperial "inch" or metric "mm". Metric being the most popular.

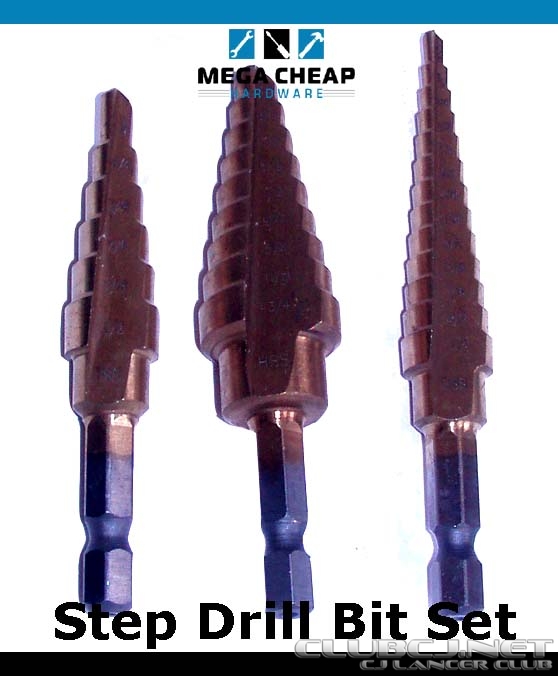
You can purchase them individually in different size ranges or as a twin or triple pack giving you a large range of sizes.

You can buy very expensive brands which are useful in the Engineering field or can just buy the general Handy-Man grade from "BUNNINGS" for approx $20 for twin pack. These will be more than adequate for drilling into the Rear Plastic Bumper.

Drilling Hint:
1) Place masking tape over the area you wish to drill your sensor holes, this will allow you to mark the right spot with a pencil or thin felt pen without causing damage to the paintwork.
2) Use a sharp pointy nail (press firmly) to centre mark the hole position.
3) Use a Cordless Drill with a small normal drill bit, approx 3mm first to spot and drill through.
4) Now use a Step-Drill and begin to drill slowly using the Cordless Drill on Slow Speed and don't press to hard. You can trigger on and off with your drill as you drill deeper and the hole increases in size.

When you reach the required size on the Step-Drill, stop drilling, remove the Step-Drill bit from the hole and your done. You should be left with a perfectly round and clean hole exactly where you wanted it.

Important: Do yourself a huge favour and buy the Step-Drill. You don't want to stuff-up drilling holes in your Bumper. You will always find many uses for it later. Money well spent.

Cheers:Sam
Last edited by SAM-24A on Thu Sep 20, 2012 4:22 pm, edited 1 time in total.

User avatar
aspir3
Site Admin
Site Admin
Posts: 8415
Joined: Tue Oct 27, 2009 6:15 pm
Location: adelaide

Postby aspir3 » Thu May 27, 2010 5:26 pm

Wei I just sent you an email with a picture of a gage from the installation instructions.

I would put it on here for other but it did not scan in the correct format for club cj, sorry.

For the sensors it says to use a 22mm wood drill bit.

For the hole in the body for the wiring loom to go through from in the boot to behind the bumper it says to use a 34mm hole saw bit.

I hope this helps.

If any one want the installation instruction I can faxl them or if some one tells me how I can scan them and put them on here I will.

User avatar
SAM-24A
Alumni
Alumni
Posts: 2921
Joined: Sun May 17, 2009 4:40 pm
Location: Sydney NSW

Postby SAM-24A » Thu May 27, 2010 5:51 pm

At Wei (solace) "Important": the hole size required for the Sensors in Zorg's SmartPark Kit is "20mm". (neat, tight fit)

22mm are for the Mitsu OEM sensors as Aspir3 mentioned.

A wood drillbit might be "OK" to use, But I cannot personally recommend it since I have never used one for the purpose of drilling holes in Car Plastic Parts.

Cheers: Sam

User avatar
aspir3
Site Admin
Site Admin
Posts: 8415
Joined: Tue Oct 27, 2009 6:15 pm
Location: adelaide

Postby aspir3 » Thu May 27, 2010 6:36 pm

SAM-24A wrote:At Wei (solace) "Important": the hole size required for the Sensors in Zorg's SmartPark Kit is "20mm". (neat, tight fit)

22mm are for the Mitsu OEM sensors as Aspir3 mentioned.

A wood drillbit might be "OK" to use, But I cannot personally recommend it since I have never used one for the purpose of drilling holes in Car Plastic Parts.

Cheers: Sam


I was very surprised how good the wood drill was. It actually cut slightly under size. I then used a small half round file to open the holes up.

As discussed before practise on some plastic first.

User avatar
SAM-24A
Alumni
Alumni
Posts: 2921
Joined: Sun May 17, 2009 4:40 pm
Location: Sydney NSW

Postby SAM-24A » Thu May 27, 2010 8:08 pm

At Troy (Aspir3)

You claimed you used a Wood Drill Bit to drill holes the the Bumper with successful results.
I'll take that as good enough proof, only since you have an Engineering background like I do.

Cheers: sam
Sam ..... *thumb*
Merlinised MIVEC - AspiRe 2.4L

User avatar
solace
Lancer Newbie
Lancer Newbie
Posts: 64
Joined: Sun Dec 14, 2008 2:57 am
Location: Adelaide, SA

Postby solace » Thu May 27, 2010 11:28 pm

cheers sam and troy, both of your input is greatly appreciated and helpful to anyone who might wanna DIY this!!

final Q sam, where abouts did you mount the speaker/buzzer? was it around the car boot area as well ? thanks for reading!

User avatar
aspir3
Site Admin
Site Admin
Posts: 8415
Joined: Tue Oct 27, 2009 6:15 pm
Location: adelaide

Postby aspir3 » Fri May 28, 2010 8:33 am

solace wrote:cheers sam and troy, both of your input is greatly appreciated and helpful to anyone who might wanna DIY this!!

final Q sam, where abouts did you mount the speaker/buzzer? was it around the car boot area as well ? thanks for reading!


I mounted my speaker in the top channel cross beam behind the back seats.

Surprisingly easy to hear.

OEM instruction tell you to mount it underneath the channel but I did not want it to get knocked off, so I thought inside was better. I also ran all the wires through there as well.

It helps if you have small hands.

User avatar
SAM-24A
Alumni
Alumni
Posts: 2921
Joined: Sun May 17, 2009 4:40 pm
Location: Sydney NSW

Postby SAM-24A » Fri May 28, 2010 4:59 pm

I did'nt use the standard kit speaker/buzzer unit, I used the optional Visual Display Unit VCD110. It has a inbuilt speaker which can be programmed (volume/pitch etc).

I thought you purchased the VCD110. If you did, then you only need use it, not both.

I mounted the Display Unit upside-down (used thick double-sided tape) on the flat section of headlining just where it meets the rear windscreen.
Read through my original post for details and photos.

Cheers: Sam

User avatar
solace
Lancer Newbie
Lancer Newbie
Posts: 64
Joined: Sun Dec 14, 2008 2:57 am
Location: Adelaide, SA

Postby solace » Fri May 28, 2010 6:26 pm

doh! just realised upon re reading that you could chg volumes on it and wondered why one would need 2 speakers .. cheers again mate :)

Big one 23
INACTIVE Member Account
Posts: 3
Joined: Sat Jan 15, 2011 7:55 pm
Location: Sydney

Postby Big one 23 » Sat Jan 15, 2011 8:07 pm

That is a great write up. I have been thinking of sensors for a while. Cause the mirrors in the lancer are not the best to judge distance. So I guess the 200 dollar come to your house installers are not worth the time of day hey??

Hmmm interesting. Also interesting to hear about the reverse camera option even though it is more of a gimmick then anything lol

Its great to find this place. Just stumbled across it today. Very interesting reading all the information available here. Well done to the Cj community. Hope I had found this place sooner :p

Lancer09
Lancer VR/GT
Lancer VR/GT
Posts: 229
Joined: Fri Nov 01, 2013 7:27 am
Location: Sydney

Postby Lancer09 » Fri Jan 31, 2014 6:49 pm

Im looking at getting sensors but i can't find any in blue…do you think a blue lancer would look funny with red sensors? lol

User avatar
lantourismo
Lancer Legend
Lancer Legend
Posts: 1248
Joined: Sat Apr 13, 2013 8:32 pm
Location: Perth, Australia

Postby lantourismo » Fri Jan 31, 2014 8:44 pm

Lancer09 wrote:Im looking at getting sensors but i cant find any in blue…do you think a blue lancer would look funny with red sensors? lol


I recently saw blue ones in gumtree or eBay


Return to “Electrical”

Who is online

Users browsing this forum: No registered users and 35 guests