***** ALERT - Nominations for your new ClubCJ Committee can be made here *****

REVERSE PARKING SENSORS

Alarms, Smart Key, Batteries, Wiring, Engine/Computer Management & Racing Chips.

Moderators: Moderators, Senior Moderators

User avatar
SAM-24A
Alumni
Alumni
Posts: 2921
Joined: Sun May 17, 2009 4:40 pm
Location: Sydney NSW

REVERSE PARKING SENSORS

Postby SAM-24A » Fri Apr 30, 2010 7:42 pm

Last year I set-out to find the best After-market Reverse Parking System available for purchase in Australia.

When I say best, I'm referring to the Design/Build and Assembly Standard of the Main Control Unit, the Sensors Quality, Innovation and Features, Pre/After Sale Technical Back-up, Price & Warranty and availability to Spare Parts in the event of Rear Collision Incident.

So after spending a considerable amount of time Net Surfing, Phoning (STD & OS), Driving and Emailing, "I believe" I have found a product that outperforms most on the Australian market.

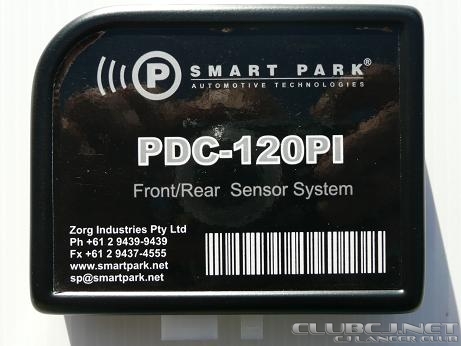
Smart Park PDC120PI (Parking Distance Control 120 Push In - Sensors) by Zorg Industries Pty Ltd.
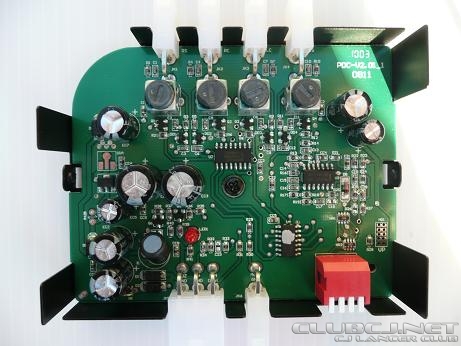
MAIN CONTROL UNIT
EXTERNAL 95mm x 75mm & INTERNAL PCB (full metal enclosure)
Image Image

-------------------------------------------------------------------------------------

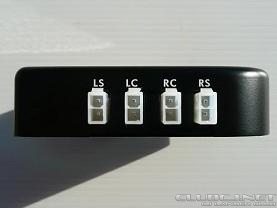
SIDE VIEWS - PLUG-INS & PROGRAMMABLE DIP SWITCHES
Image-----------Image-----------Image
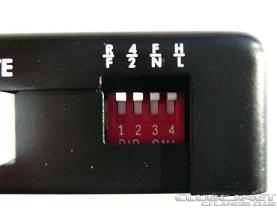
These 4 Dip Switches allow the user to adjust the desired Set-Up and Parameters.
F/R = Front or Rear Bumper Mounted Sensors.
4/2 = Number of Sensors Used.
F/N = Detection Range (Full - 2.1m) (Normal - 1.5m).
H/L = High or Low Sensitivity

-------------------------------------------------------------------------------------

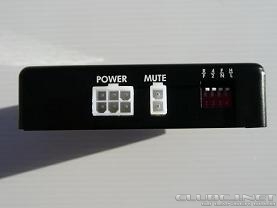
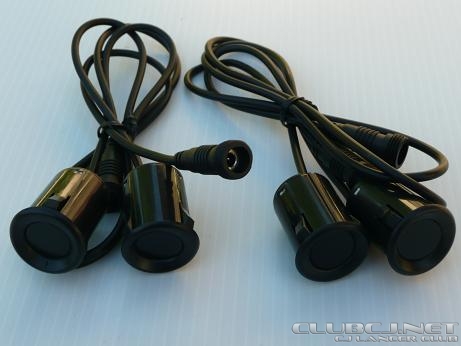
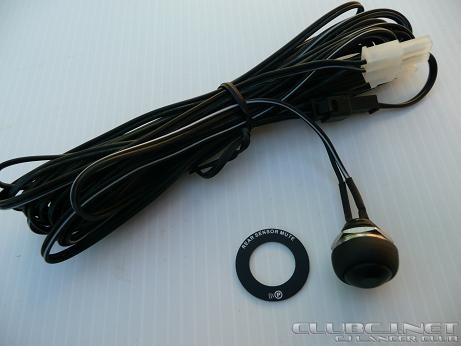
SENSORS & MUTE BUTTON
Image--Image
Sensors are Low Profile High-End Units (Note: Longer Body Housing & Screw Fit Weather Proof Connectors) (20mm Mounting Hole)

Mute Button: Can be used to Temporarily Mute the System in the event of a Known Obstruction for which you Do-Not require Alert Attention.
(Fitting is Optional and Non Fitment does not alter or effect the Systems Operation)

-------------------------------------------------------------------------------------

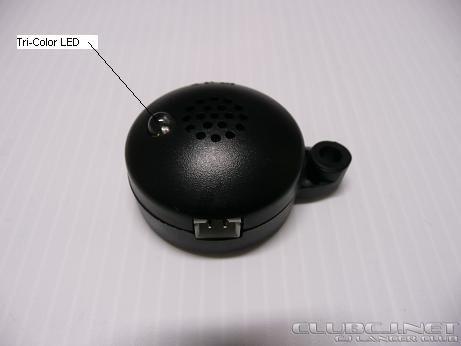
STANDARD SPEAKER/BEEPER ------- OPTIONAL VISUAL CONTROL DISPLAY VCD-110
Image-Image
The Standard Speaker/Buzzer has a Tri-Color LED and can be screw or Velcro mounted.

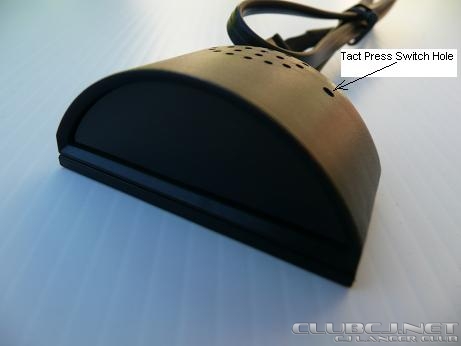
The Optional Visual Control Display Unit VCD-110 is Fully Programmable via the Tact Press Switch Hole.
Dimensions = 44mm Wide x 30mm Deep x 18mm High -- Half Moon Shape.

Adjustable Display Settings / Functions Include:
Beeper Volume.
Tone Selection.
Display Brightness.
Digit Display - Right Side-Up or Up-Side Down.
Distance Measurement - Feet or Meters.
Alarm Zone - Solid or Flashing.
First Distance Detection Zone - Audible or Silent.

-------------------------------------------------------------------------------------

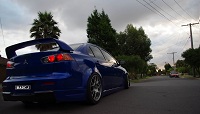
INSTALLATION IN YOUR LANCER

POWER CONNECTION
Image-Image
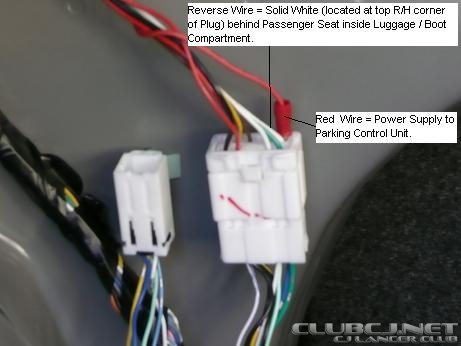
The Power Supply Wire (solid white - top R/H corner of plug) for your Reverse Lights is located behind the L/H Rear Passenger Seat in the Luggage/Boot Compartment.


MAIN CONTROL UNIT PLACEMENT
Image-Image
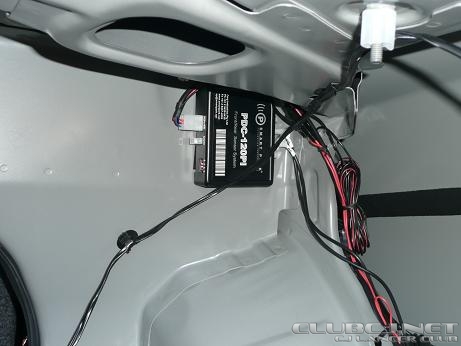
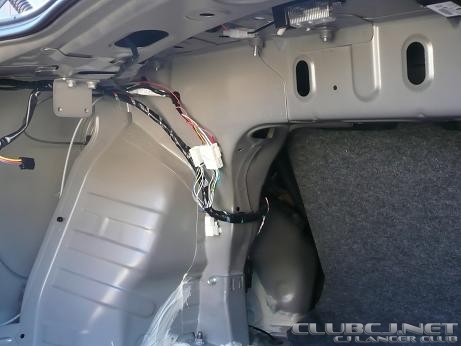
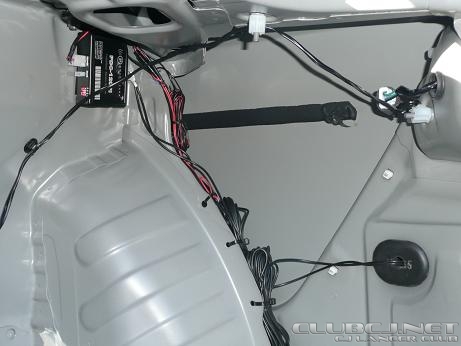
I chose to install the Main Control Unit just below the Parcel Shelf on the R/H side of the Boot. The wiring is secured via zip-ties in the holes along the wheel arch seam and the Sensor Wires run through a hole punched in the larger Rubber Grommet on the Inner Guard Panel.
Once the Boot Lining is re-installed, the entire installation is completely hidden and un-obtrusive as is the genuine OEM fitment.


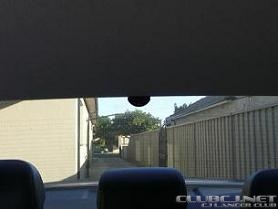
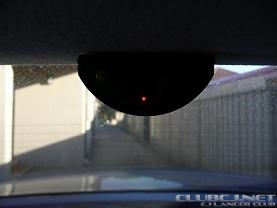
VISUAL CONTROL DISPLAY UNIT PLACEMENT.
Image---Image---Image---Image
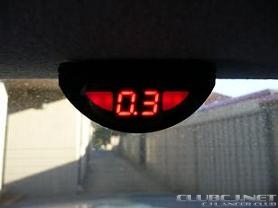
I chose to mount the VCD upside down on the flat section of the Head Lining just where it meets the Rear Windscreen. (used Thick Double-Sided Tape)
The wiring is discreetly tucked inside the Headlining and run across to the drivers side and tucked in behind the Air-Bag Panel and down through a hole which leads into the boot adjacent to the main Control Unit.

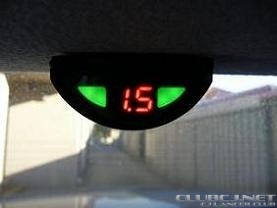
The VCD displays 3 Zone Detections:
Zone 3 -- Green -- 0.8m-1.5m in Normal Range........1.0m-2.1m in Full Range.
Zone 2 -- Amber -- 0.8m-0.4m in Normal Range........1.0m-0.4m in Full Range.
Zone 1 -- Red ----- 0.4m-0m in Both Ranges.


SENSOR INSTALLATION
Image

I chose to mount only 2 Sensors in the Rear Bumper.
Reason being is that the detection area of Ultra Sonic Sensors resembles an open Hand Fan. 2 sensors mounted centrally will suffice detection to the outer edges of the vehicle. Extra sensors mounted close to the outer ends of the bumper will only detect unnecessary peripheral objects which extend beyond the vehicles perimeter which can lead to miss-guided alerts.
However, the choice is entirely yours 2 or 4 sensors.
Try 2 at first and gauge the sensor range as per your requirements.
If not sufficient, then add another 2 in an suitable place.


WIRING DIAGRAM
Image
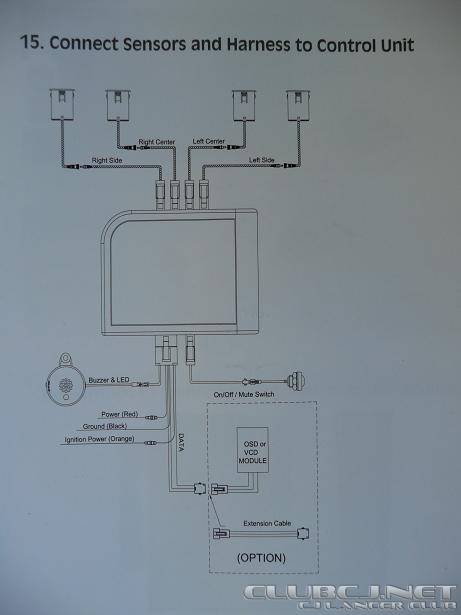
Ignition Power Orange Wire need only be connected if you decide to use the Mute Button mentioned previously.


FEATURES

3 Year Manufacturers Guarantee.
2 or 4 Sensor / Front or Rear.
Automatic Rear Activation.
Adjustable Range and Sensitivity.
Installs into Plastic or Metal Bumpers .
Self Learning capability to ignore vehicle mounted objects.
eg: Tow Bar, Rear Mounted Wheel, Bicycle Rack etc.
Auto-mute function for use when Towing.
Optional Adjustable Audio/Visual Display Unit.
Low profile, small diameter Sensors.
ABS plastic Sensor housings, designed for painting.
Self-diagnostic check on start-up.


CONCLUSION
I know there are many other brands in the market place such as: Cellpak, Proxel, Dynamco, Steelmate, Tresorplus, Bosch, Hella, Mongoose, Ploaris, Axis, Park Dynamics, Carkitco, and Mitsu’s OEM Lumen.
I have viewed and researched most of these brands personally / physically and via electronic correspondence and found that most are only generic Asian units sourced and re-branded via after-market logos and sold for none other than a quick business buck. When confronted with Technical and/or After Sales questioning, many simply failed and were unable to supply much more than could be read on the packaging box.
I'm not stating or implying in any manner that these brands are inferior, but most are only reasonably adequate and do not equate to the build quality and design features found in the Smart Park unit.
The only brand available on the Australian Market worthy of comparable quality is the Bosch Park Pilot unit priced at approx $600. At this price, most Auto Elect Outlets won't even keep one on the shelf, and even it doesn't include the same features found in the Smart Park unit.

Since this product has been primarily aimed at the Commercial Automotive Sector it is not readily found in the Retail Marketplace. It can be ordered through some Bursons Auto Outlets who source it from a major Electronic Distribution Centre called Cooldrive Distribution who have an outlet based in every state of Australia.

I am currently in communication with the National Sales Manager of Zorg Industries with reference to direct purchasing and pricing.


PS: As it occurred with my in-depth posts on Pedders Coilovers and Whiteline Swaybars.
I state affirmatively, I do not and never have had any affiliation with Zorg Industries.
I just have this crazy addiction for research into products I set my intentions on. I thrive on it so much I wish sometimes I could just say no and stop, but I cant until its complete.
Sure I benefit from my pursuit of product excellence with the satisfaction of ownership and usefulness, however the feeling of sharing my research is equally satisfying.
So please don't judge, I'm only trying to benefit the accepting members of this club with products I find in my opinion worthy of announcement.


Cheers: Sam
Last edited by SAM-24A on Thu Sep 20, 2012 4:17 pm, edited 6 times in total.

User avatar
aspir3
Site Admin
Site Admin
Posts: 8415
Joined: Tue Oct 27, 2009 6:15 pm
Location: adelaide

Postby aspir3 » Fri Apr 30, 2010 8:12 pm

Good work as always Sam.

Some of those parts look the same as the genuine Mitsubishi. The speaker and the sensors.

Just out of interest do you sensors go off at the ground at all. Mine go off when I am at the bottom of my driveway and it is only a small slope.

User avatar
tadz0rz
Genius
Genius
Posts: 6955
Joined: Sun Mar 08, 2009 8:54 pm
Location: Melbourne, VIC, Australia
Contact:

Postby tadz0rz » Fri Apr 30, 2010 8:18 pm

I love your work haha

Excellent writeup as usual Sam
Got a question? Read the ClubCJ Ultimate Guide First!!
Image
Just...Dont worry about it ;)Dont Click Me

User avatar
billyboy
Lancer Evolution
Lancer Evolution
Posts: 778
Joined: Fri Feb 20, 2009 1:45 pm
Location: Sydney, Australia

Postby billyboy » Fri Apr 30, 2010 8:28 pm

Nice write up Sam & looks like a quality product. Only question is how much would you expect to pay for this unit?

I've got a mate that's into reverse sensor install game, unfortunately the market is flooded with the Chinese branded stuff & car dealers want everything cheap as chips (so they can put their high markups). :x

Pity its come to that.

User avatar
SAM-24A
Alumni
Alumni
Posts: 2921
Joined: Sun May 17, 2009 4:40 pm
Location: Sydney NSW

Postby SAM-24A » Fri Apr 30, 2010 8:42 pm

Thanks Micheal and Troy for your rap.
Troy, From memory the Speaker/Beeper is the only common component, although this one can be also muted via the optional Mute Button rather than having to physically flick the tiny Lo/Hi/Off switch.
The Detection Face on these Sensors are Tilted upward, and when fitted in the correct orientation, do not read the ground surface and false sense, unless the vehicle is placed in an extreme position.

User avatar
billyboy
Lancer Evolution
Lancer Evolution
Posts: 778
Joined: Fri Feb 20, 2009 1:45 pm
Location: Sydney, Australia

Postby billyboy » Fri Apr 30, 2010 8:45 pm

aspir3 wrote:Just out of interest do you sensors go off at the ground at all. Mine go off when I am at the bottom of my driveway and it is only a small slope.


I think its cause you have the flat type sensor that's installed in the outer curves of your bumper.

I've pretty much got mine in the same spot as yours, but my sensors have a 10 degree angle, which pretty much points them straight ahead off a curved base & avoids false alarming. I've got a pretty steep driveway & aok. :wink:

User avatar
aspir3
Site Admin
Site Admin
Posts: 8415
Joined: Tue Oct 27, 2009 6:15 pm
Location: adelaide

Postby aspir3 » Fri Apr 30, 2010 8:50 pm

billyboy wrote:
aspir3 wrote:Just out of interest do you sensors go off at the ground at all. Mine go off when I am at the bottom of my driveway and it is only a small slope.


I think its cause you have the flat type sensor that's installed in the outer curves of your bumper.

I've pretty much got mine in the same spot as yours, but my sensors have a 10 degree angle, which pretty much points them straight ahead off a curved base & avoids false alarming. I've got a pretty steep driveway & aok. :wink:


No! Mine are the same. They are on an angle and have been fitted correctly.

They are angled up but the bumper is angled down. I positioned them as per instructions. I believe they should be placed higher in the bumper.

User avatar
SAM-24A
Alumni
Alumni
Posts: 2921
Joined: Sun May 17, 2009 4:40 pm
Location: Sydney NSW

Postby SAM-24A » Fri Apr 30, 2010 8:57 pm

Hi Bill, your right about Chinese branded Products which enable dealers to profit from high mark-ups, like I said in my post about the quick business buck. I purchased mine in October 09, but only got around to fitting it on the Anzac Weekend. Price = as I mentioned in my post, I'm currently talking to Zorgs National Sales Manager, but indications are Approx $215 for the Main Unit PDC120PI and $40 for the optional Visual Control Display VCD110. And I believe you will be able to transact a Credit Card purchase + P&H over the phone direct from Zorg.

Allow me early next week, and I will confirm all direct contact and price details.

Sam

User avatar
billyboy
Lancer Evolution
Lancer Evolution
Posts: 778
Joined: Fri Feb 20, 2009 1:45 pm
Location: Sydney, Australia

Postby billyboy » Fri Apr 30, 2010 9:14 pm

Oh, sorry aspir3. :oops:

My instructions said to install them 350-450mm off the ground, think from memory they're at about 430mm. Maybe I was lucky cause the RA bumper has a less sensitive angle.

Mine are just set of ebay cheapies.

User avatar
SAM-24A
Alumni
Alumni
Posts: 2921
Joined: Sun May 17, 2009 4:40 pm
Location: Sydney NSW

Postby SAM-24A » Fri Apr 30, 2010 10:03 pm

The Smart Park instructions state a min of 500mm from the ground surface. However mine are mounted at 470mm without any problems.
The Kit also includes 2 sets (8) Angled Rings to compensate for Contoured Bumpers.

-------------------------------------------------------------------------------------

The OEM Mitsu Sensor Kit is supplied by Lumen Australia based in Hallam, Victoria.

The Kit's main components are sourced from the Asian market and re-branded as a Lumen product. Lumen then configure and assemble the wiring looms to allow plug'n'play installations into various Car models and supplies them as an OEM Kit. These Kits are "OK" in terms of quality and functionallity.

The problem with the OEM Kit is not so much the kit components themselves, but more the placement position of the sensors.
I believe that Lumen has not carried out adequate and/or extensive R&D protocol in order to determin correct sensor positions. They simply position them to low/close to the ground surface which trigger false alerts.

One possible remedy is to fit Angled Rings which aim the Sensor Higher/Away from the ground surface.

Many Lancer owners I've spoken to have reported similar problems.

Sam

User avatar
aspir3
Site Admin
Site Admin
Posts: 8415
Joined: Tue Oct 27, 2009 6:15 pm
Location: adelaide

Postby aspir3 » Fri Apr 30, 2010 11:42 pm

Gee I wonder if Mitsubishi would admit their mistake.

They sold the reverse parking sensors as there own with instructions.

The only way to fix it neatly is to replace the rear bar and mount them higher as Sam suggested.

I am worried I will hit some thing as I often ignore the sensors as I think it is just the ground.

User avatar
SAM-24A
Alumni
Alumni
Posts: 2921
Joined: Sun May 17, 2009 4:40 pm
Location: Sydney NSW

Postby SAM-24A » Sat May 01, 2010 12:11 am

I doubt very much that Mitsu will admit fault. They will probably continue to find fault will your installation (since you installed yourself). For example if you've lowered the vehicle or that your 1mm out in accordance with the installation diagram.

I viewed your garage and noticed the sensors on the outer ends of the bumper seem to be mounted on a contoured part and are aiming at the ground, where as the other two (either side of your number plate) are mounted on a flat surface and seem to be parallel to the ground surface.

Try disconecting the outer end sensors, I have a feeling this may remedy your false alerts. If so, then leave them disconnected, or fit some angled rings to aim them up. at least you will still have a system that works adequately and only you know.

Sam

WTR
Lancer Evolution
Lancer Evolution
Posts: 892
Joined: Sun Apr 04, 2010 8:16 pm
Location: Hawkesbury, NSW

Postby WTR » Mon May 17, 2010 9:02 pm

Hi Sam,
Re your first post - do you know if the connection point you used is located in the same spot for the Sportback ?

Cheers, Ron.

User avatar
milobob
Lancer Legend
Lancer Legend
Posts: 1130
Joined: Mon Aug 31, 2009 6:16 pm
Location: Melbourne

Postby milobob » Mon May 17, 2010 9:09 pm

Great write-up.

Our outlander came with only 2 sensors installed.. though at the corners of the bumper. This makes them miss really thin poles/objects in the middle.

That said, the do pick up objects at the corner of the bumper that middle ones may not mount - mainly when you reverse and TURN (this is usually when I think side sensors tend to be more useful) :)
2010 RenaultSport Megane RS250 Cup Trophee (Xenons+Leather+Front Parkers)

briansharque
Lancer Newbie
Lancer Newbie
Posts: 89
Joined: Fri May 14, 2010 12:06 am
Location: WA, Perth

Postby briansharque » Wed May 19, 2010 9:47 pm

Great write up. Anyone know where should I go through to get the cable from the sensor into the trunk to the unit?
VRX Sportback


Return to “Electrical”

Who is online

Users browsing this forum: No registered users and 38 guests