***** ALERT - Nominations for your new ClubCJ Committee can be made here *****
X Factor Air Dams
Moderators: Moderators, Senior Moderators


I actually dread the day I install mine.. following hte guide I did a rough fit with the airdams on the bumper.. not easy to get it perfectly straight! I wonder if its possible to drill from the wheel arch or from under the car hmm..
2010 RenaultSport Megane RS250 Cup Trophee (Xenons+Leather+Front Parkers)


Step 1 ) Remove the front bumper
Step 2 ) Locate the factory pre-mark marking at the inner side of the bumper
Step 3) Drill holes at the marking from inner side of the bumper. the holes must be in oval shape.
Step 4 ) Install the front airdam to the bumper, at the same time do some adjustment to made sure it fit to the bumper without gap
Step 5 ) Drill holes at the under bumper and tighten with bolt & nuts
Step 6 ) Put back the bumper
Done !!!!
Estimated 1 hour
 [flash width=600 height=200 loop=false]http://i438.photobucket.com/albums/qq110/X-Factordesign/E-MailBanner.swf[/flash]
robnkel wrote:It took me approc 2-3 hours in total.
The method was to put some sticky dots on the airdams then roll them on from the wheel arch end, when removed it leaves behind the dots, which is where you drill the holes.
This method isn't great as I needed to double up on the dots so as to leave dots behind when "unrolling" the airdam.Or else they wouldnt get left behind.
Because of the extra thickness of the dots it meant that the dots further from the wheel arch were no longer accurate.
Anyhow I managed but I ended up with a slight gap at the 90 degree wrap around at the starting point..ie the wheel arch.
A far better way would be for the airdams to arrive with a paper "template" which you would attach to the front bumber with some masking tape etc and simply drill holes at the marked positions. Far simpler, more accurate, and why am I the only person to think of it? Bugger me!! Its not rocket science.
A great product somewhat let down by poor installation instructions and methods.
The is the same method that apply from the OEM.
[flash width=600 height=200 loop=false]http://i438.photobucket.com/albums/qq110/X-Factordesign/E-MailBanner.swf[/flash]robnkel wrote:It took me approc 2-3 hours in total.
The method was to put some sticky dots on the airdams then roll them on from the wheel arch end, when removed it leaves behind the dots, which is where you drill the holes.
This method isn't great as I needed to double up on the dots so as to leave dots behind when "unrolling" the airdam.Or else they wouldnt get left behind.
Because of the extra thickness of the dots it meant that the dots further from the wheel arch were no longer accurate.
Anyhow I managed but I ended up with a slight gap at the 90 degree wrap around at the starting point..ie the wheel arch.
A far better way would be for the airdams to arrive with a paper "template" which you would attach to the front bumber with some masking tape etc and simply drill holes at the marked positions. Far simpler, more accurate, and why am I the only person to think of it? Bugger me!! Its not rocket science.
A great product somewhat let down by poor installation instructions and methods.
Ideally this may not the best method to apply. but is the same as what OEM applying.
[flash width=600 height=200 loop=false]http://i438.photobucket.com/albums/qq110/X-Factordesign/E-MailBanner.swf[/flash]-
Sgt Kulpepper
- INACTIVE Member Account
- Posts: 17
- Joined: Sun May 23, 2010 11:18 am
- Location: Brisbane
Sgt Kulpepper wrote:Just wondering if you got my email Shadows. I would pm you but Im under the 20 posts needed to do so.
Cheers
Yes !!! already added you name on the Q
Please refer to group buy first page : http://clubcj.net/viewtopic.php?p=121094#121094
Thanks
[flash width=600 height=200 loop=false]http://i438.photobucket.com/albums/qq110/X-Factordesign/E-MailBanner.swf[/flash]-
Sgt Kulpepper
- INACTIVE Member Account
- Posts: 17
- Joined: Sun May 23, 2010 11:18 am
- Location: Brisbane
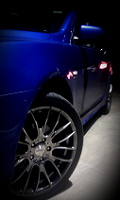
So I installed the front airdams after making sure that it wouldn't scratch when I go up my driveway (thanks for SIRVRX for testing  )
)
Anyway, I looked on the inside of my bumper - didn't see any premarked holes for the airdams.
Used the X-factor method supplied, but I doubled up on the round markers. Also, before I pressed the airdam onto the bumper for the markings, I took the markings on and off the airdam to ensure that the markings would come off on the bumper when pressed against it.
I found that when drilling the holes, you only need to be careful of the water tank with the second screw on the drivers side (from the back). Also, after numerous tries, it seems the best way to enlarge the holes would be an UPWARDS oval shape. This way the airdams will fit FLUSH with the crease line on the lower bumper. Make sure when you tighten the screws that you press the airdam onto the bumper firmly (check the bottom of it). The first screw from the front is the WORST to tighten.
The Airdams fit reasonably well once all the screws are tightened. Very happy with them. There are some microgaps but nothing an average person will pick-up. I am very particular about detail so that's probably a reason why I picked up the microgaps.
Gave the airdams a good wax and most of the gaps are now hidden (as when the wax dries it turns white - cheap armour all wax).
Anyway, I looked on the inside of my bumper - didn't see any premarked holes for the airdams.
Used the X-factor method supplied, but I doubled up on the round markers. Also, before I pressed the airdam onto the bumper for the markings, I took the markings on and off the airdam to ensure that the markings would come off on the bumper when pressed against it.
I found that when drilling the holes, you only need to be careful of the water tank with the second screw on the drivers side (from the back). Also, after numerous tries, it seems the best way to enlarge the holes would be an UPWARDS oval shape. This way the airdams will fit FLUSH with the crease line on the lower bumper. Make sure when you tighten the screws that you press the airdam onto the bumper firmly (check the bottom of it). The first screw from the front is the WORST to tighten.
The Airdams fit reasonably well once all the screws are tightened. Very happy with them. There are some microgaps but nothing an average person will pick-up. I am very particular about detail so that's probably a reason why I picked up the microgaps.
Gave the airdams a good wax and most of the gaps are now hidden (as when the wax dries it turns white - cheap armour all wax
2010 RenaultSport Megane RS250 Cup Trophee (Xenons+Leather+Front Parkers)


Try david.kuek@x-factordesign.com.
I got quoted A$232 including shipping a couple of months back. And that's with a free set of window visors thrown in.
I got quoted A$232 including shipping a couple of months back. And that's with a free set of window visors thrown in.
VG/Ultra Racing/Whiteline/Work/Ralliart/Supercircuit/Cosworth/Pioneer/BC/Recaro

Who is online
Users browsing this forum: No registered users and 34 guests